
After trying all of these troubleshooting steps, if you have any defective or missing parts, click HERE to submit a replacement parts request form to our helpful Technical Support Team!
**NOTE: The edition of your kit is important to making sure the correct parts are sent to you. Please be sure to provide the production code from your box (located near the barcode, format: ####L##D####) OR provide the edition of your kit as listed on the back cover of your instruction manual.**
Step-by-Step Assembly Video
Using and Troubleshooting your Candy Claw Machine
Complete Online Assembly Instruction Manual
*See back cover of manual for edition number
Download Manual- 4th Edition
Download Manual- 2nd & 3rd Edition
Download Manual- 1st Edition
Additional Information for Trickiest Steps
Alternate instructions for installing the ribbon
The ribbon moves the claw from side to side. Below you will find alternate instructions for installing the ribbon.
**NOTE: If you have a 1st-3rd edition kit, a new clip (A18) has been added to help keep the ribbon spools in place. If you need the A18 clip, click HERE to submit a replacement part request form.**


You may find it easier to wind the spools and reinstall the axle with the machine on its side.

The ribbon should be taut. If you pull gently on one side of the ribbon, the worm screw housing should move smoothly.
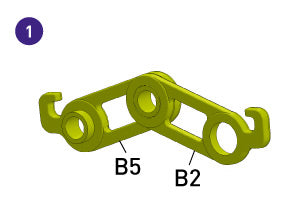
Alternate instructions for assembling the scissor arm mechanism
Here are more detailed instructions that break down how to assemble the scissor arm mechanism.
The parts here are shown upright, but it's easiest to assemble them flat on a table.

Carefully pick up the parts to insert A10. If they come apart, place them back together before moving on to the next step.


Hydraulics Troubleshooting
If your hydraulics are not holding water, let's try some troubleshooting!
Alternate Oiling and Refilling Video
Claw is not Closing
Claw not closing all the way? Skip to timestamp 1:18 for help.
Still having trouble with your hydraulics? Try checking all of your cylinders, piston seals and tubing for any cracks, pinholes, cuts or defects.
If you find something wrong, click HERE to submit a replacement parts request form to our helpful Technical Support Team (including a photo of your damaged part is also helpful)!
**NOTE** Please be sure to provide the production code from your box (located near the barcode, format: ####L##D####) OR provide the edition of your kit (found on the back cover of your instruction manual). Knowing the edition of your kit is important to making sure the correct parts are sent to you.
Cylinder Parts by Edition Reference:
The edition of your kit can be found on the back cover of your instruction manual.
Comments
0 comments
Article is closed for comments.